Groups
Summary
Use Groups to set up groupwork and manage administrative and assessment-related tasks.
This guide is primarily aimed at teaching staff. Administrative staff managing assessments may wish to follow the guide: Setting up Groups to manage extensions, flagging and multiple markers using CSV files.
Introduction to groups
Groups can be used to facilitate collaborative tasks and assessment and manage site administration, eg:
- set up submission points for group assignments (presentations, projects etc.)
- split Discussions by group to give each groups a private discussion space or make discussions more manageable for large cohorts
- set up marking groups to assign submissions for marking and filter the Gradebook (usually set up by administrators)
- manage content visibility based on group (eg. restrict access to a resit submission point only to students in a Resit group)
- send messages to specific group(s) rather than cohort-wide announcements
Group sets
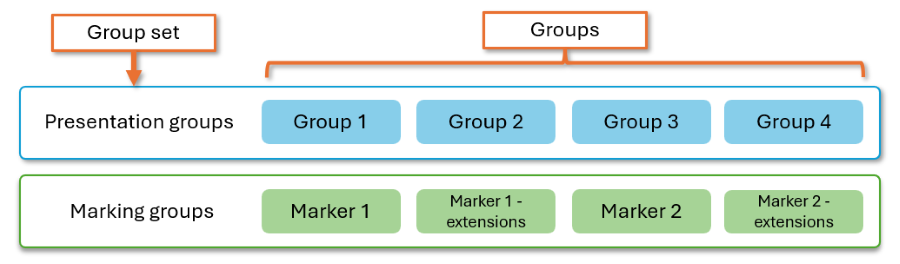
A group set is a 'group of groups' for a specific purpose. For example:
- Presentation groups: groups for each presentation group. Group 1, Group 2 etc.
- Marking groups: groups for different markers and/or flag extensions and exemptions. Marker 1, Marker 1 - extensions, Marker 2 etc.
Visibility
Note
If students will interact with each other, the group set must be visible.
In a visible group set, students can see which group they are in and the other members of their group. In a hidden group set, students cannot see any group details or interact with other group members.
Set an appropriate visibility based on how the group set is used:
| Usage | Student interaction | Visibility |
|---|---|---|
| Facilitate groupwork: assignments, discussions etc. | Yes | Visible |
| Marking groups | No | Hidden |
| Manage access to content | No | Hidden |
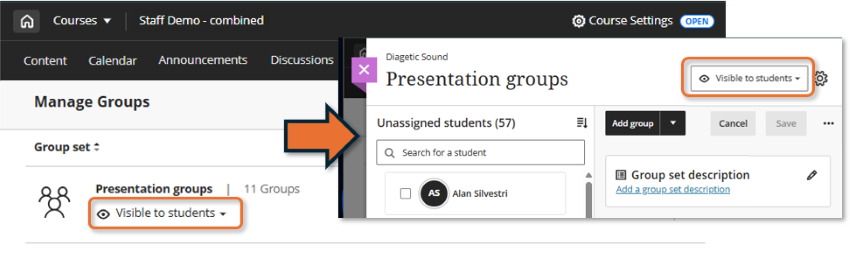
The visibility menu appears in two locations:
- Groups tab: under each group set name
- Group set page: next to group set name on the top right
Create new groups & enrol members
- Open the Groups tab from the top navigation bar within your site.
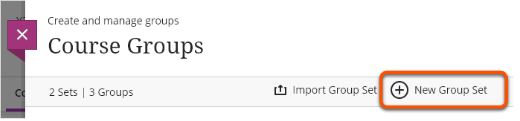
- Click the New group set button and select the relevant enrolment type (this can be changed later).
- Follow instructions below to complete set up for the relevant enrolment type.
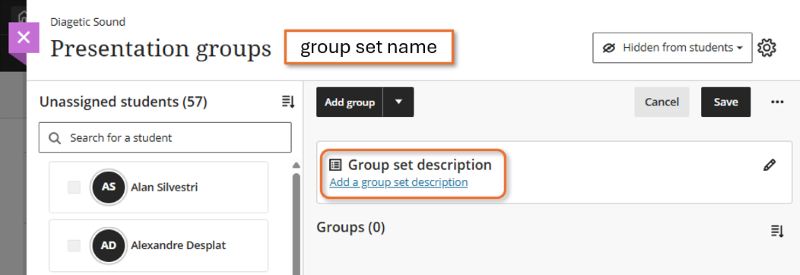
- On the group set page, enter a name for the group set (eg. Presentation groups) and optionally enter a group set description.
Manually assign
Use to assign specific students to specific groups.
First create the groups:
Create individual groups
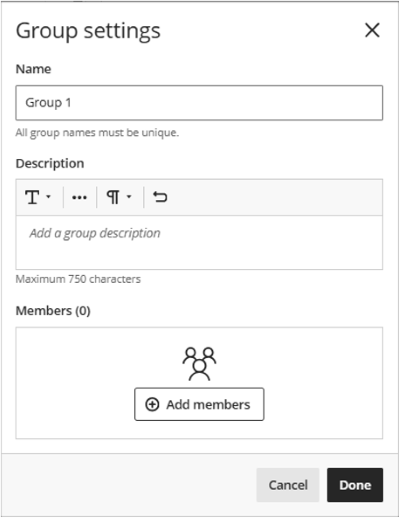
- Click Add group or the chevron icon next to it and select Create a group.
- On the Group settings panel, enter a group name and optionally a group description. By default, groups are named Group 1, Group 2 etc.
- You can click Add members to enrol students at this point, but we recommend creating all groups first.
- Click Done.
Create multiple groups
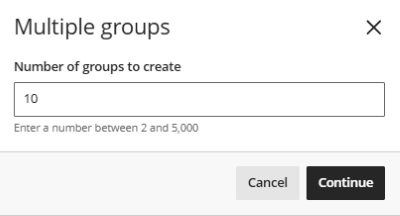
- Click the chevron icon next to Add group and select Create multiple groups.
- On the Multiple groups panel, enter the number of groups to create, then click Continue.
- Groups are created and named Group 1, Group 2 etc.
Then assign students to groups using one of the methods below. When assignments are complete, set the group set visibility and click Save.
Assign from the student list
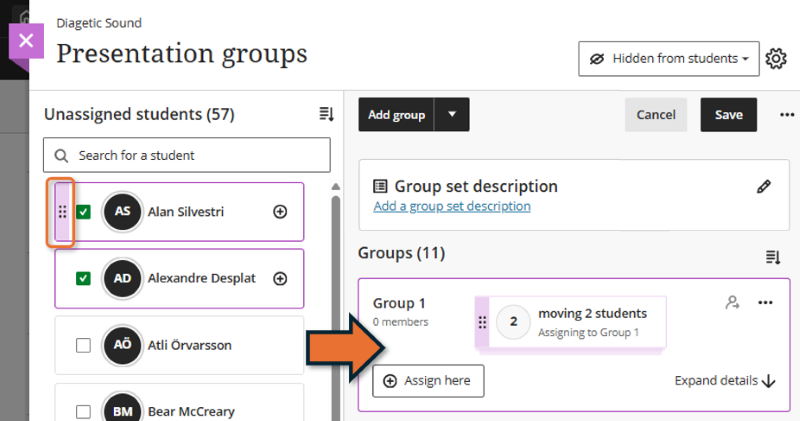
There are multiple ways to assign students to groups:
- Click the plus icon then select a group and click Assign to group
- Hover on the left of a student's name, click and hold the purple bar that appears then drag and drop to the relevant group.
- Tick the box next to a student's name to assign multiple students at once.
Assign from the group list
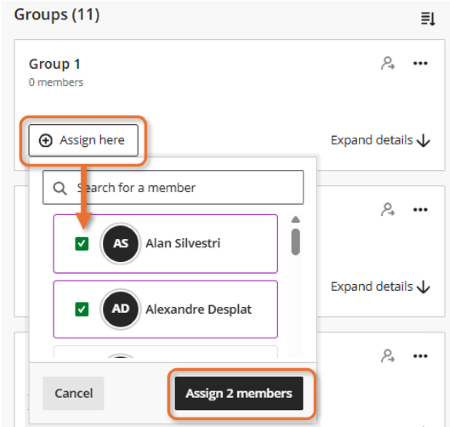
On the relevant group, click + Assign here, select the relevant students and then click Assign [x] members.
Automatic enrolment
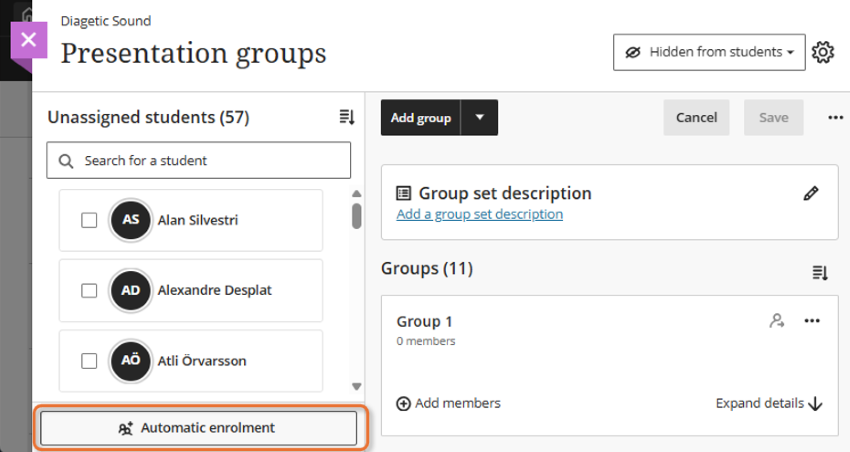
Click Automatic enrolment at the bottom of the student list to randomly assign students to groups. Note this will create additional groups rather than using any existing groups.
Automatically assign
Use to randomly assign students to groups.
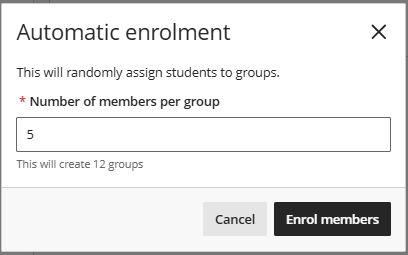
- On the Automatic enrolment panel, enter the number of members per group then click Enrol members.
- Groups are created and named Group 1, Group 2 etc. and students randomly assigned.
- Set the group set visibility and click Save.
Self-enrol
Use to let students choose which group to join (eg. different project topics).
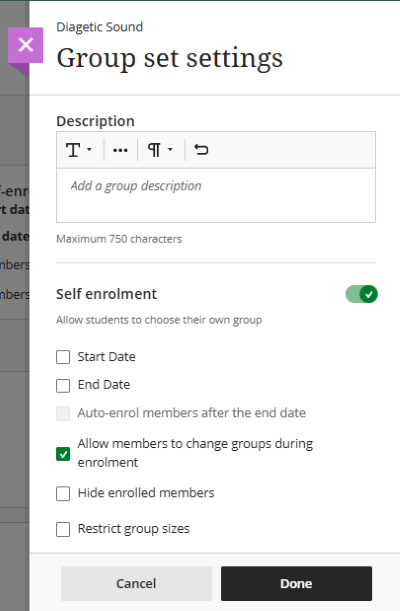
- On the Group set settings panel, make sure the Self enrolment toggle is on.
- Set the remaining settings:
- Start/end date for enrolments, and whether to auto-enrol unassigned members after the end date
- Allow members to change groups during enrolment (default on)
- Hide enrolled members: so students can't see other members when selecting a group
- Restrict group sizes: to set maximum group size
- Click Done.
- Groups are created and named Group 1, Group 2 etc.
- Click Save on the main group set page.
Self-enrolment can also be turned on after groups are created by opening the group set settings via the cog icon on the main group set page.
Import from CSV
Use to upload groups and/or enrollments from a speadsheet. Can be very useful for large cohorts.
Administrative staff managing assessments may wish to follow the guide: Setting up Groups to manage extensions, flagging and multiple markers using CSV files.
Import groups
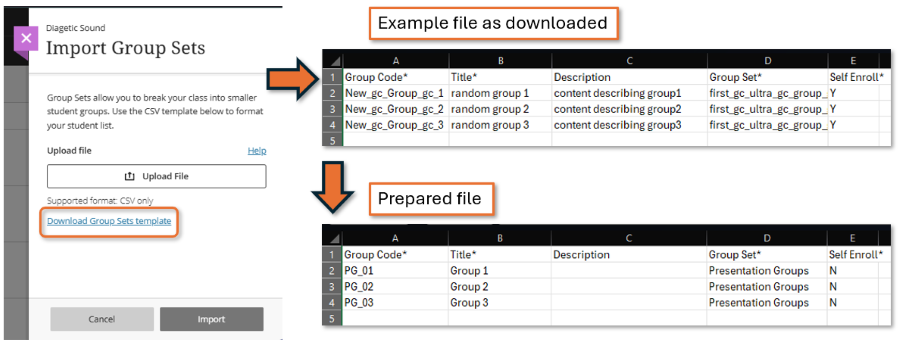
- On the Import Group Sets panel, click Download Group Sets Template.
- Open the downloaded file sample_groups.csv in Excel.
- Edit the file to your requirements. The file contains the following columns:
- Group Code: for ID within the system only. It doesn't matter what these are, as long as each group has a unique code. Eg. PG_01, PG_02 etc.
- Title: the name of the group as shown to users. Eg. Group 1, Group 2 etc.
- Description: optional.
- Group Set: name of the group set as shown to users. Eg. Presentation Groups
- Self Enroll: Y (yes) or N (no)
- Save the file in .csv format.
- Go back to the Import Group Sets panel and click Upload File. Select your file and click Import.
- Wait for the confirmation email. The new Group Set will now appear in the list (may require refreshing the page).
Groups can also be imported to an existing group set:
- Open the group set page and click the three dots icon next to Save, then select Import groups or members.
- On the Import Groups or Members panel, stay on the Create Groups tab and follow the instructions above.
Import group members to existing groups
- Open the group set page and click the three dots icon next to Save, then select Import groups or members.
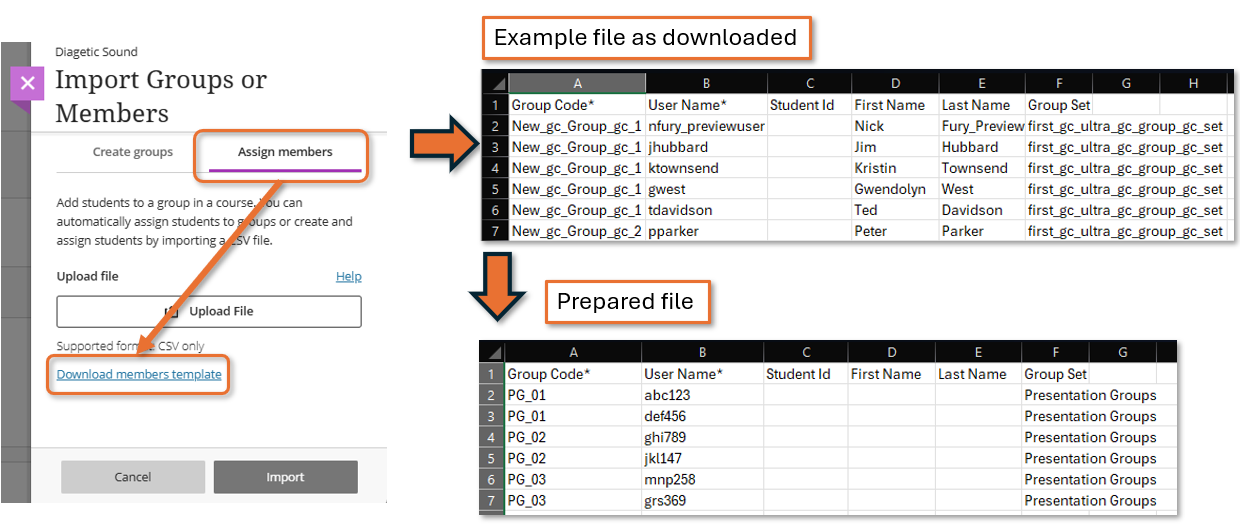
- On the Import Groups or Members panel, click the Assign members tab, then click Download members template.
- Open the downloaded file sample_groupmembers.csv in Excel.
- Edit the file to your requirements. The file contains the following columns:
- Group Code: the relevant group ID code from the import groups file. Eg. PG_01, PG_02 etc.
- Username: the student's IT username, eg. abc123, def456
- Student Id, First Name, Last Name: do not enter anything here (use the username to identify students)
- Group Set: name of the relevant group from the import groups file. Eg. Presentation Groups
- Save the file in .csv format.
- Go back to the Import Group Sets panel and click Upload File. Select your file and click Import.
- Refresh the group set page to see the resulting student assignments.
Once groups have been created and assignments made, all group management must be done manually rather than by importing another CSV.
Manage existing groups & members
Add and delete groups
To add a group to an existing group set, use the same methods as described above to manually assign users to groups.
To delete a group:
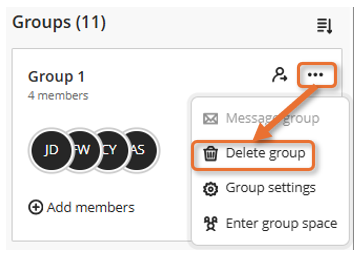
- Click the three dots icon on the top right of the group, then click Delete group.
- On the pop up, click Delete to confirm.
- Any students in the group are returned to the Unassigned students list.
Groups can't be deleted if the the group set has been used in a group assignment.
Move and unassign students
Note
If students are moved between groups, this applies to all Assignments or Discussions the group is associated with. Any grades move with them, but their work does not (ie. they will lose access to the original group's materials).
To move students between groups, first unassign them from the original and then reassign to the new group using the same methods as described above to manually assign users to groups.
To unassign students:
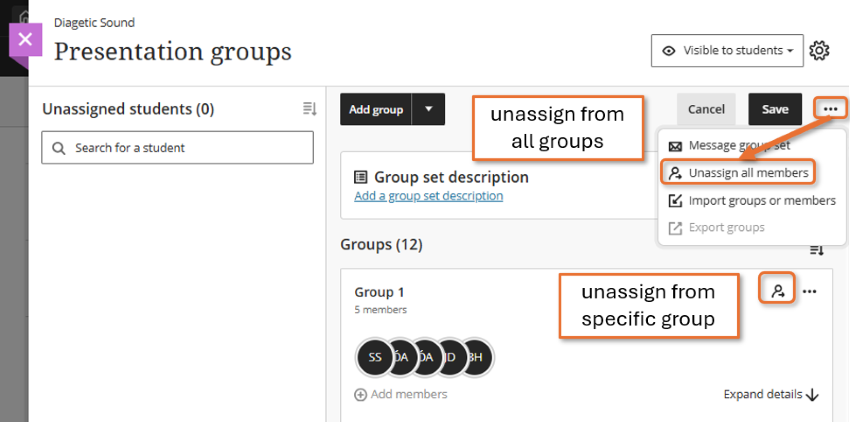
- All students from all groups: click the three dots icon next to Save, then select Unassign all students. On the pop up, click Unassign all to confirm.
- All students from a specific group: on the relevant group, click the person with arrow icon in the top right of the box. Note there is no additional confirmation step.
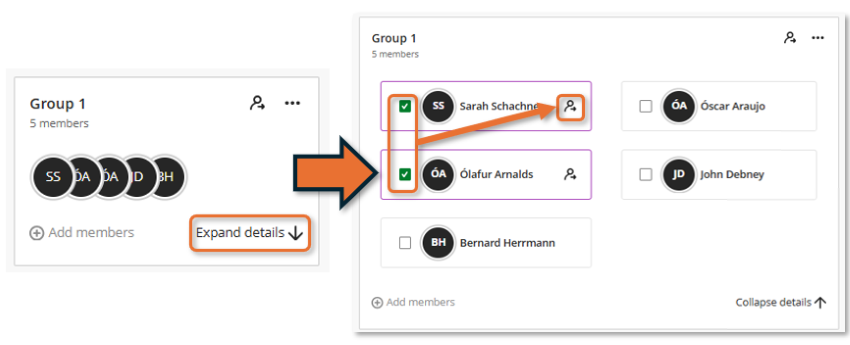
- Specific student(s) from a specific group: on the relevant group, click Expand details. Tick the box next to the relevant student names, then click the person with arrow icon next to one of the names. If a pop up appears, click Unassign to confirm.
Unassigned students are returned to the Unassigned students list. Students can't be unassigned in bulk if the group set has been used in a group assignment.
Group space
The group space collates details of group members & associated content. Students can also access this through the Groups tab.
- Click the three dots icon on the top right of the group, then click Enter group space.
- The Content tab shows that group's associated Assignments and Discussions. The Members tab lists all group members, with the option to search and Message members (students cannot send Messages).
Group FAQs
Can students see every group?
No; in a visible group set students can only see their own group members and associated group items. In a hidden group set, students cannot see any group details at all.
Do all students have to be assigned to a group?
No; within a group set, students can be unassigned. This doesn't affect the other groups.
This can be useful for situations that apply to only a subset of students. For example, you can use a group set to manage access to resit assessment materials, with one group for students taking the resit and other students unassigned.
What happens if students move between groups?
If a group set is hidden from students (eg. marking groups), they won't have any indication that they have changed groups.
If a group set is visible to students (eg. for a group assignment), they will lose access to their original group and any submissions, discussion posts etc. made in the group. If they are moved after and group submissions have been marked, they will retain the mark from the original group, not their new one (although this can be manually overridden) - it's much easier to move students before submissions if possible. See the guide to group assignments for more information.
Why aren't the groups showing in Student preview?
To see any groups in Student preview, you must first assign your student preview user to a group:
- Enter Student Preview in the top right.
- Once in Preview mode, click Exit in the top right. When prompted, click Save.
- Back in staff mode, go to the Groups page and open the relevant group set page.
- Find your student preview user in the Unassigned student list (in the format You Name_PreviewUser) and assign them to a group.
- Enter Student Preview again; you should now be able to test what students in that group see.
- When you have finished, click Exit in the top right. When prompted, click Discard to delete your preview user data.