Ultra Gradebook
Summary
The Gradebook collates all assessments and submissions from across the site. You can access each assessment, mark or view submitted work and download grades.
For more complex assessment administration guidance, see our Assessment Tracker guides.
Tip
This guide does not cover how to mark assessments. Instead, please see our tool-specific guides for details:
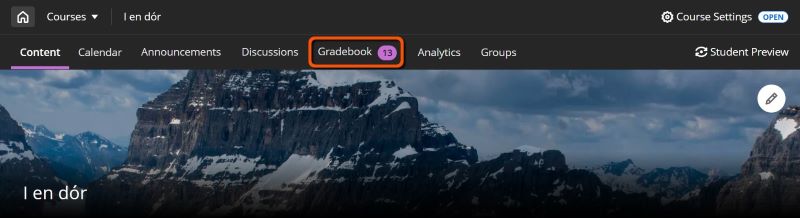
Access the Gradebook through the tab in the top navigation bar within a site.
This tab may also display an icon, depending on what action is needed:
- a number: count of submissions that need marking
- exclamation mark (!): no submissions to mark, but there are marks to post
Within the Gradebook, there are two views presenting assessment information in different ways:
List View (markable items)
Use for: a summary of marking status for all assessment items.
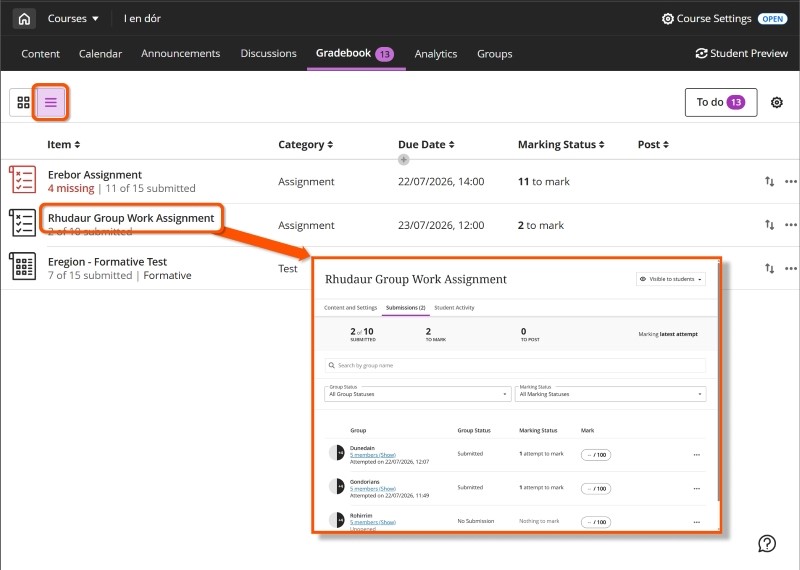
Click Gradebook, then select the List View icon (three stacked horizontal lines). This displays all assessment items in the site with the due date and number of submissions left to mark or post.
Click the title of an assessment (or the number in the Marking Status column) to open its Submissions tab.
Grid View (student marks for each item)
Note
On small screens (eg. a mobile phone) or with a narrow browser width, the Grid View reverts to the List View.
Use for:
- a grid view of all students and all assessments
- filtering for a marking group or specific assessment
- quick access to a particular submission
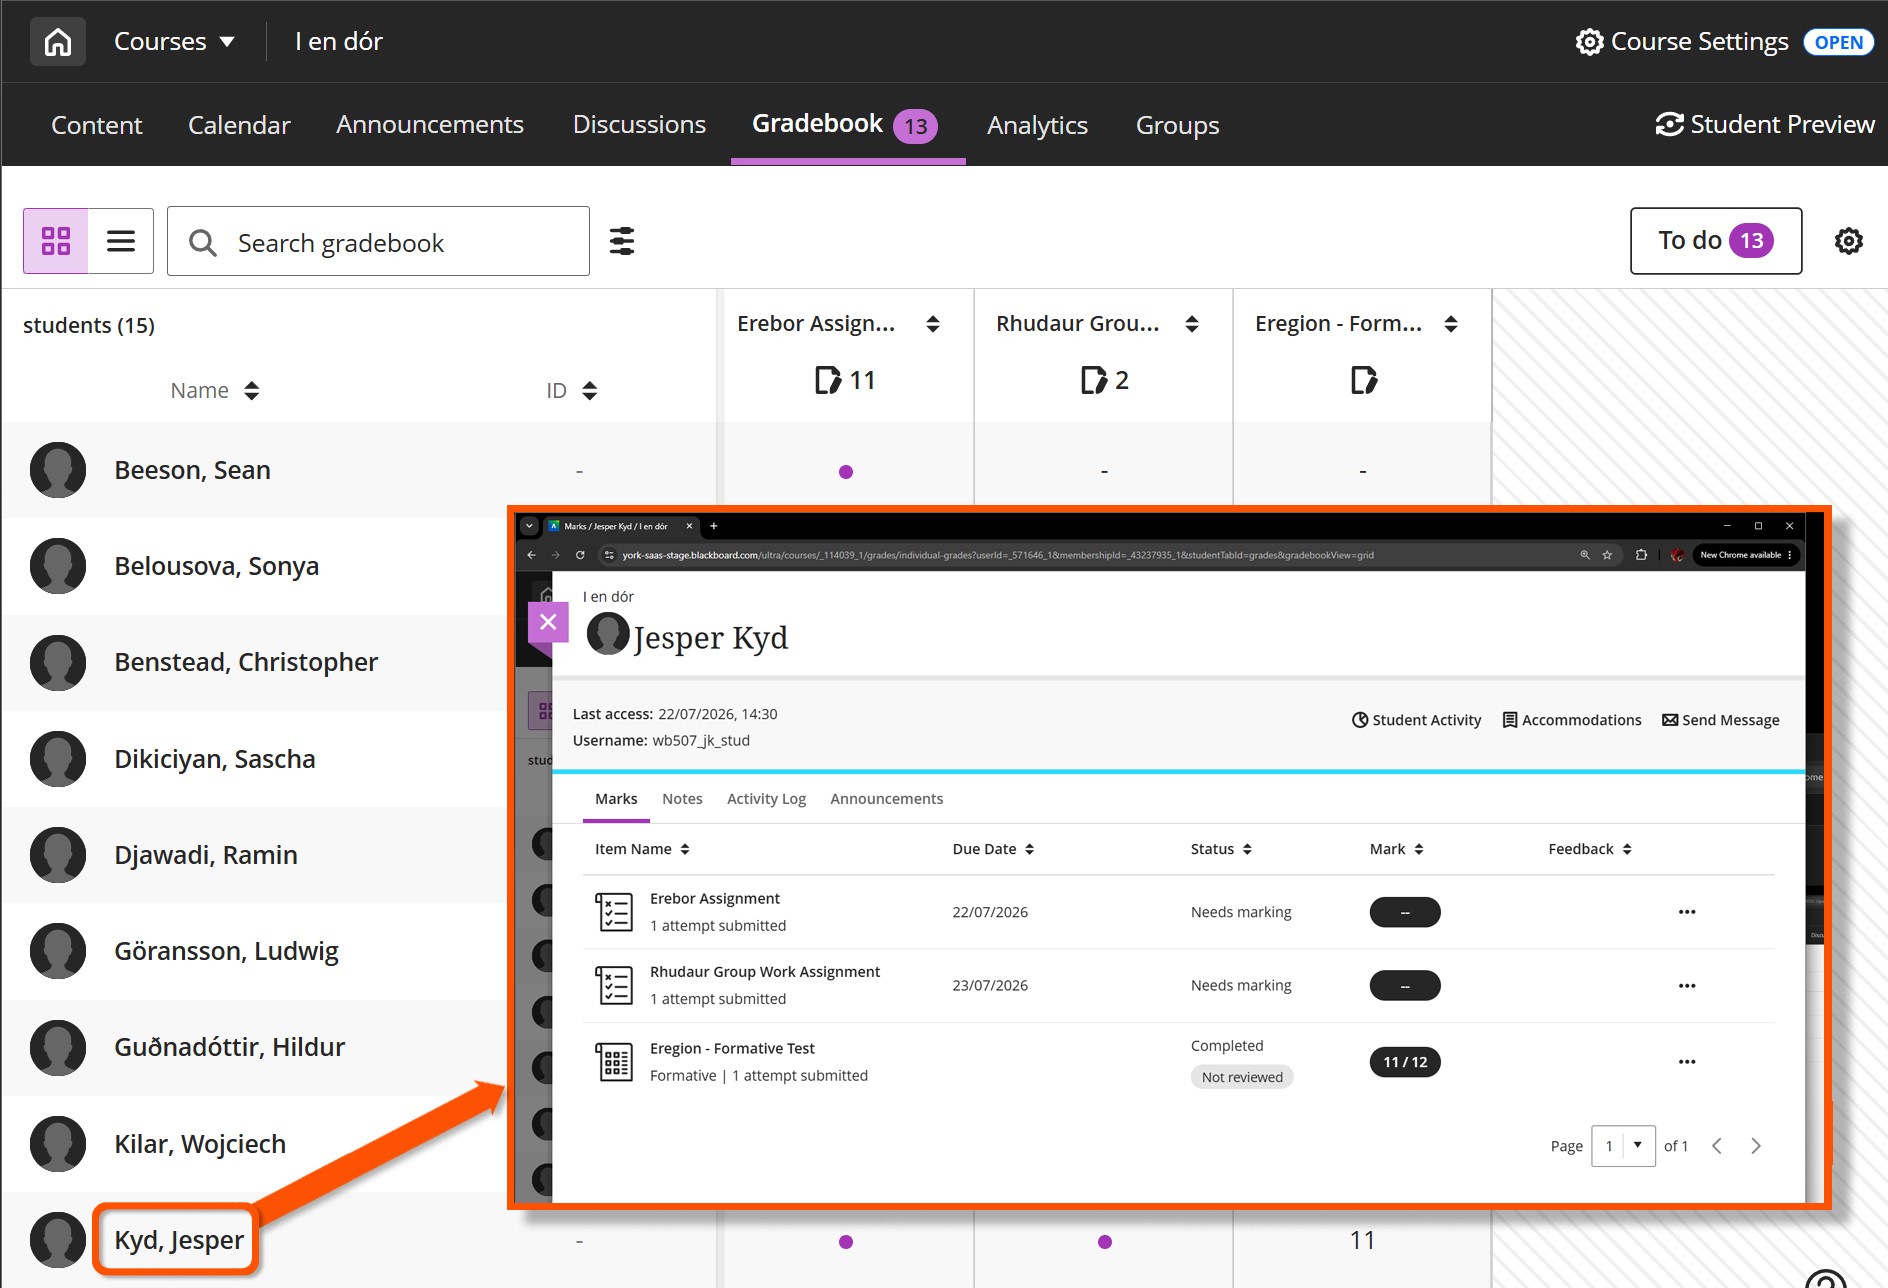
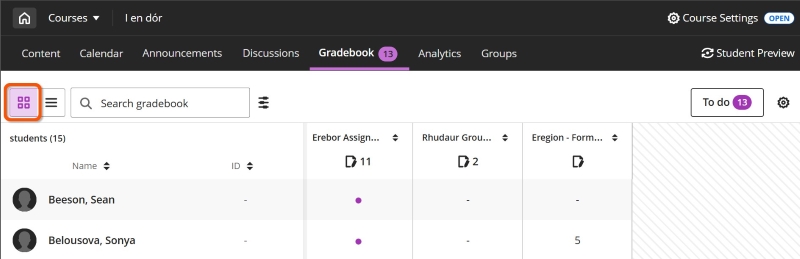
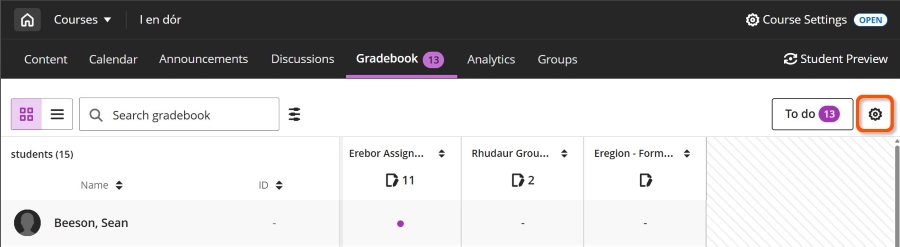
Click Gradebook. The Grid View is the default view, but can be selected specifically using the Grid View icon (small squares in a 2x2 block). This displays a grid of students enrolled on the site (rows) and assessment items (columns).
A purple dot shows an unmarked submission from that student for the relevant assessment. After grading this changes to the mark awarded.
Open submissions
To open the general marking interface for an assessment, click the page and pencil icon in the column header. The number next to the icon shows the number of unmarked submissions.
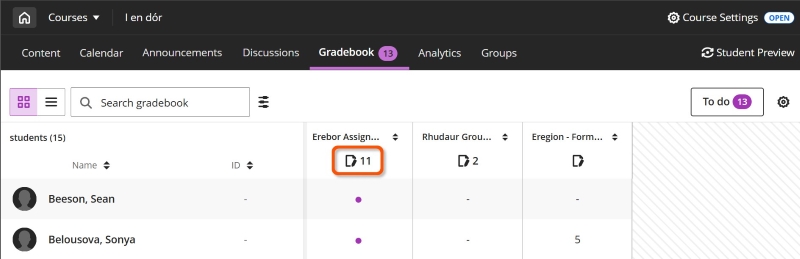
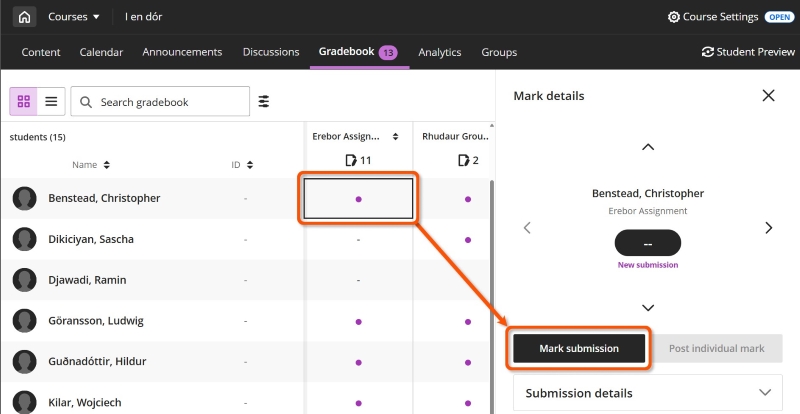
To open a specific student's submission, click the relevant cell to open the Mark details panel, then click Mark submission (for ungraded submissions) or View submission (for graded submissions).
Sort
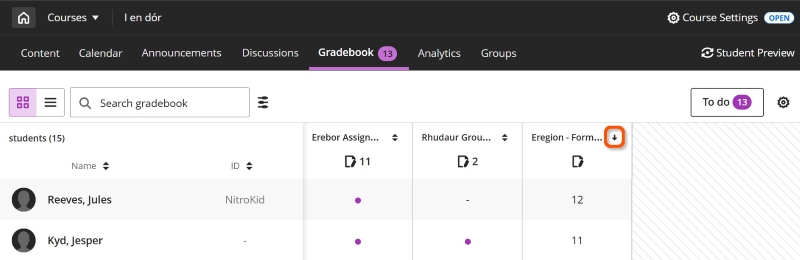
To sort by scores, click the arrow icons to the right of the assessment title in its column header. Click once for low to high, click again for high to low, click again to remove ordering on that column.
To sort by name or student ID, click the arrow icons at the top of the column. You can change whether to sort by first/given name or last/family name in the Student Options Settings.
Filter
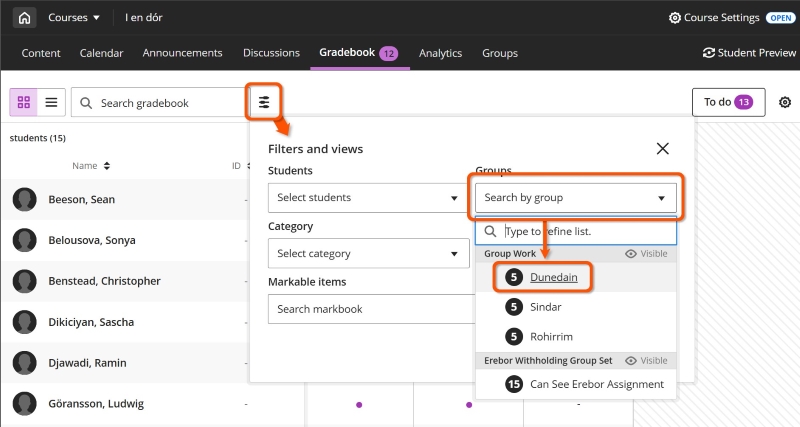
Click the Filter icon (three stracked horizontal sliders) above the grid to open the Filters and Views panel. Filter by any of: Students, Groups, Category, Types or specific Markable items, then click Apply.
Search
You can search for student name, assessment title, category, recipt code etc. Type into the search box above the grid. As you type, a drop-down appears showing any matches to your search.
Click an item in the drop down to show only that row/column as relevant. Click the x icon in the search box to remove the search filter.
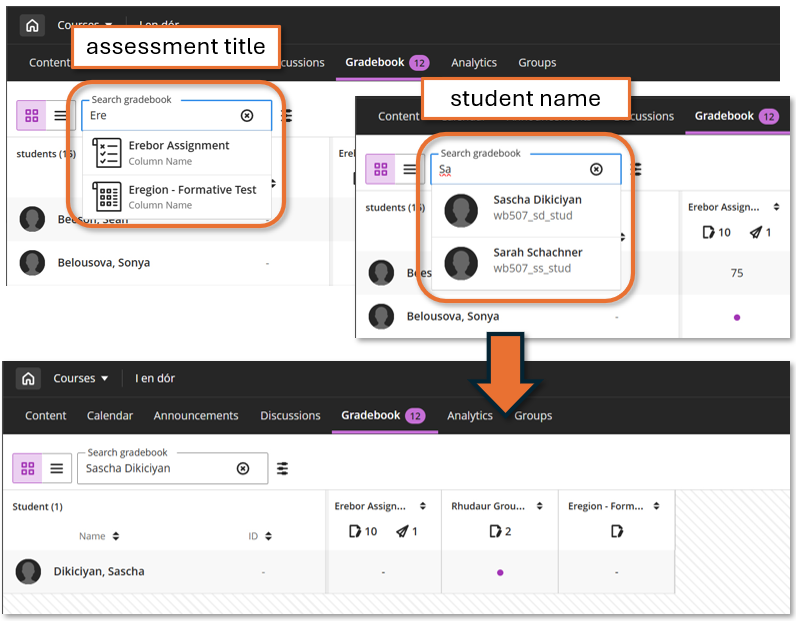
Currently, searching on a submission receipt returns the full column for the assessment, not the specific submission (we have passed on feedback that this is not ideal).
To locate a non-anonymous submission by its receipt code, the simplest way is to download the Mark history for that specific assessment. This contains submission receipt codes and the relevant student name, which you can then search for in the Grid View.
Edit marks directly in the Gradebook
Tip
It is possible to add and edit marks directly in the Grid View, but this has some implications for how marks may appear, so we recommend all edits are done in the main marking interface.
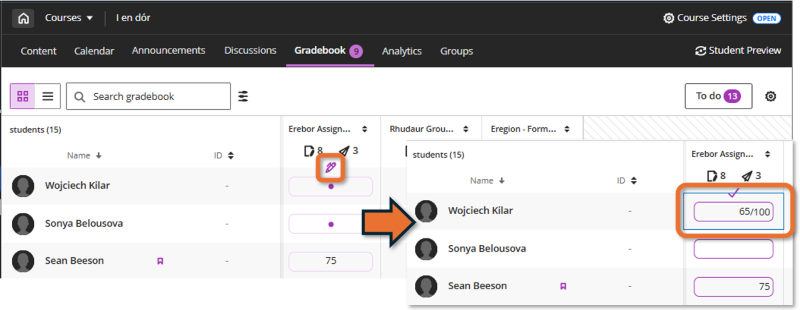
To edit marks directly in the Grid View column, hover at the bottom on the column's header cell. Click on the purple pen icon that appears and make changes as needed in the cells. When you are finished, click the purple tick icon to save the edits.
Assessment details panel
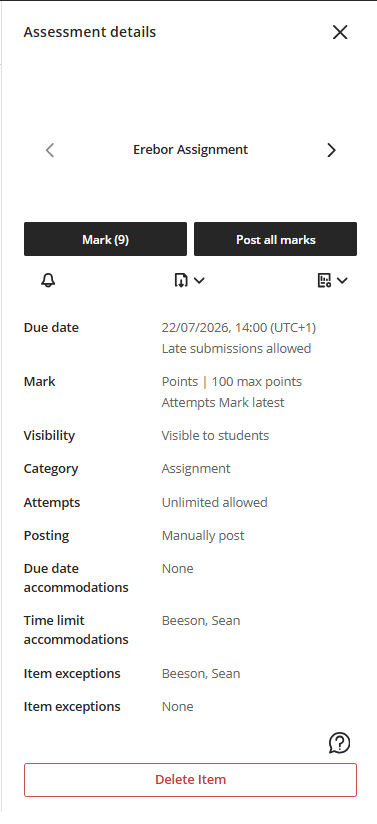
Click an item's title in the column header to open the Assessment details panel. This contains various assignment-level information and tasks.
Navigation
Use the left/right arrows to move between assessments.
Mark submissions
If submissions need marking, click the Mark button to open the marking interface. The number of submissions that still need marking is displayed on the button in brackets. If marking is complete the button will read View submissions instead.
If the assessment is marked anonymously, this is the only way to open the marking interface via the Grid View.
Post all marks
If any submissions have been marked, it is possible to click Post all marks button to release marks and feedback to students. If the assessment was set up to be anonymous then posting de-anonymises the submission point. Once posted, this cannot be undone.
If no submissions have been marked yet, the Post all marks button will be greyed out.
Warning
In general you should not press this button; it's more typical to mark all submissions and for administrative staff to post all marks simultaneously.
Task icons
- Send Reminder (bell icon): click to send a reminder to students that have not made a submission.
- Download (document with a downward pointing arrow icon): click to download submissions or download results per question.
- Statistics (document with a bar graph icon): view the overall marks distribution and other statistics.
Assessment settings
Lists various assessment settings (these can't be edited here):
- Due date: the general due date and any settings for allowing late submissions
- Mark: how the assessment is marked and which attempt is marked
- Visibility: if the item is visible to students
- Category: the assessment item type
- Attempts: how many attempts allowed
- Posting: if marks are released manually or automatically
- Accommodations and exceptions: names of students with the various course-level and item-level accommodations.
Delete item
Warning
If an assessment item is deleted, this cannot be undone. If you want to delete an assessment item, discuss this with your departmental administrative team.
Click this button and follow the prompts to delete the item and all submissions made and marks/feedback given.
Mark details panel
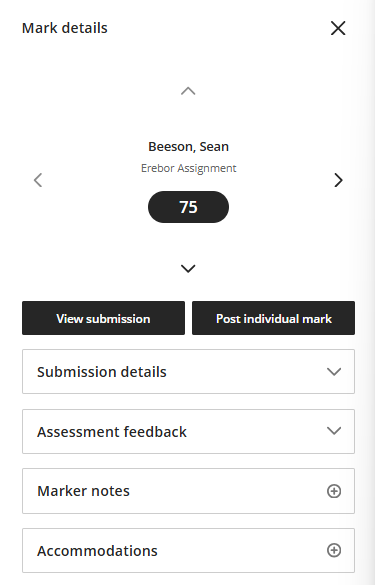
Click on a cell to open the Mark details panel for a submission. This contains various information about the assessment and the specific submission.
Navigation
Use the up/down arrows to move between students within the same assessment and the left/right arrows to move between assessments for the same student.
Mark/View submission
Click the Mark submission (for ungraded submissions) or View submission (for graded submissions) button to open it in the marking interface.
If the assessment is anonymously marked, these options are not available. Instead. open the marking interface for all subvmissions via the Assessment details panel.
Post individual mark
After marking, the Post individual mark button becomes available; this releases the mark and any feedback to the individual student. Once posted, this cannot be undone.
Warning
In general you should not press this button; it's more typical to mark all submissions and for administrative staff to post all marks simultaneously.
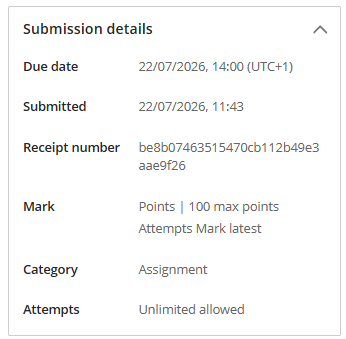
Submission details
This shows details of the student's submission and also a summary of the assessment marking settings:
- Due date: the main assessment due date. Any personal extensions set for the student (in the VLE site) appear in Accommodations (see below).
- Submitted: the date and time of the student's last submission.
- Receipt number: the submission receipt code of the student's last submission.
- Mark, Category, Attempts: summary of the general assessment settings.
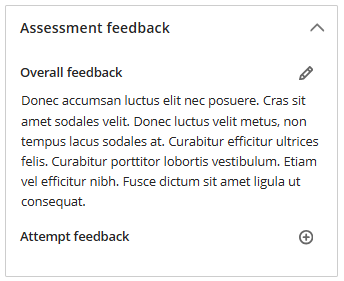
Assessment feedback
This shows any feedback given within the marking interface. This will be shown to students after marks are posted.
This shows Overall feedback and any specific Attempt feedback for multiple attempts. You can edit or add feedback here using the pencil icon or plus icon respectively, although we'd recommend adding feedback in the marking interface instead.
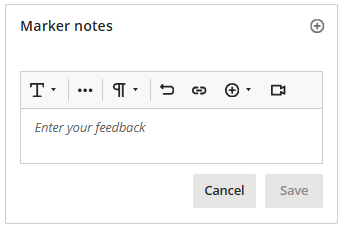
Marker notes
This is a ‘staff-eyes-only’ field and can be used similarly to feedback fields discussed above. This will not be shown to students after marks are posted.
Notes here may be useful for moderation purposes or in cases of academic misconduct, for example.
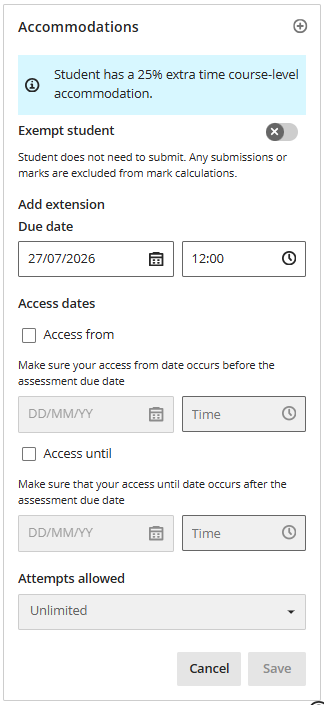
Accommodations
This section is for setting assessment-specific accommodations for individual students. You can:
- exempt the student from needing to submit.
- add a personal extension to the main assessment due date.
- provide a personal access window using Access from and/or Access until release conditions.
- limit or extend the number of attempts the student is allowed to make for the assessment.
Any course-level accommodations for the student are also shown (eg. 25/50% extra time for timed assessments), but can't be edited here.
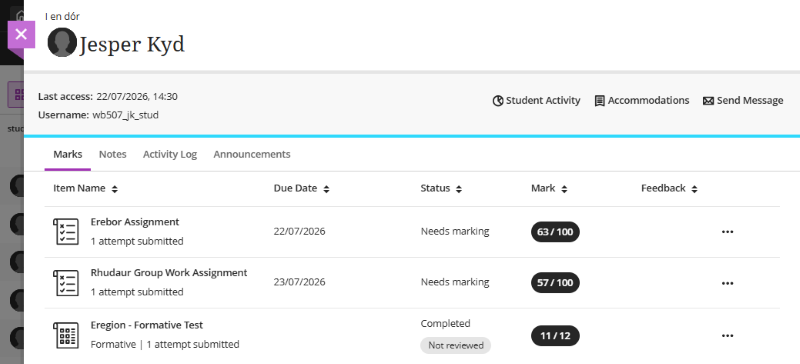
Student overview panel
In Grid View, click a student's name to open their overview panel. This summarises all of the student's information relating to the site, including:
- Submission details and marks for each assessment and whether they have reviewed feedback
- Course-level accommodations
- Various activity logs
- Opportunity to send a personal Message (if enabled in the site)
Gradebook settings and assessment resources
On either Gradebook view, click the cog icon on the right of the Gradebook navigation bar to open site-wide Gradebook Settings panel.
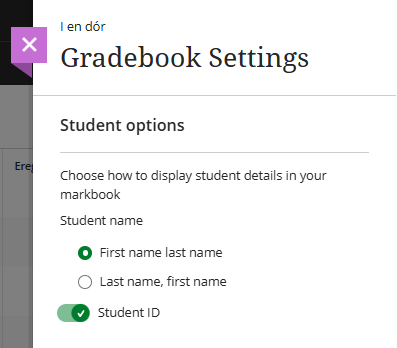
Student options
Select how to display student names:
- First name last name (sorts on first/given name)
- Last name, first name (sorts on last/family name)
You can also toggle the Student ID display on or off; this may help view assessment columns more comfortably on a smaller screen.
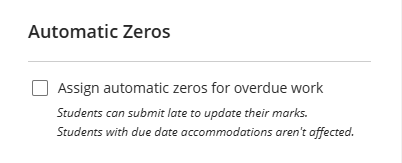
Automatic zeroes
- Automatically give a zero score if no work is submitted by the deadline.
- This doesn't affect deadline accommodations or assessment-specific late submission settings
- Recommended setting: off (default for sites created from January 2025).
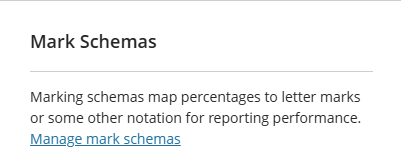
Marking schemas
- Marking schemas can be used to display an overall numerical mark as a qualitative grade or status, eg. A/B/C or Complete/Incomplete.
- Numerical marks aren't overridden; students and staff can still access the mark awarded to specific submission attempts.
- Only applies to in-built Ultra assessment types (ie. not TurnItIn or Gradescope).
- Find out more on our guide to Marking schemas
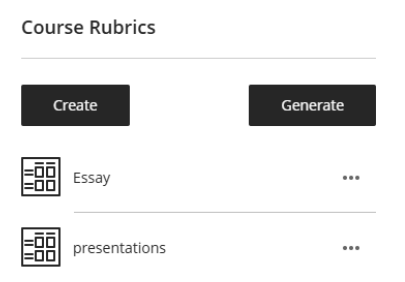
Course rubrics
- View, edit (if not yet used for marking), duplicate or delete all marking rubrics associated with the site.
- Option to create a new rubric or generate one with AI to later deploy in an assessment.
- Only applies to in-built Ultra assessment types (ie. not TurnItIn or Gradescope).
- Find out more on our guide to Marking Rubrics
Gradebook data
Tip
Anonymously graded assessments must be de-anonymised (by clicking Post all marks) to allow downloading marks or results.
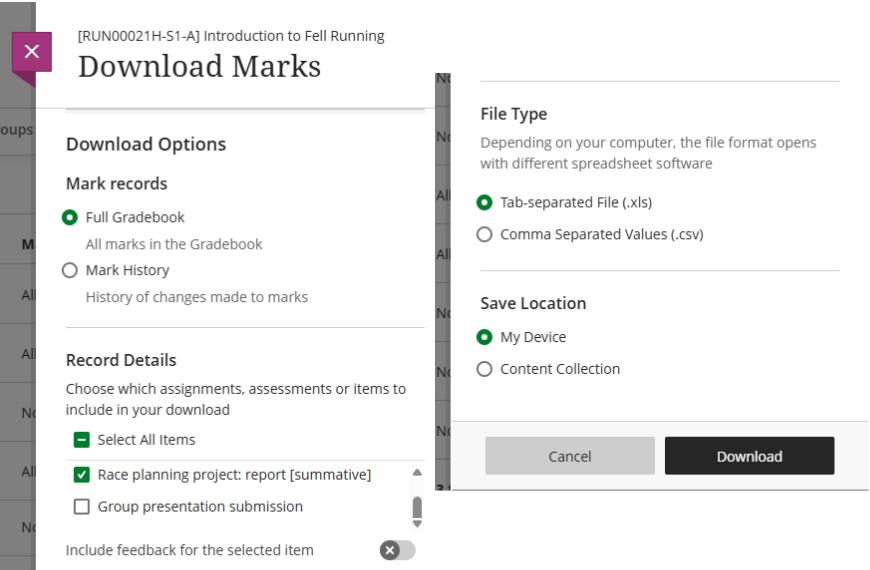
Download overall marks
Use to download: final mark per student for each selected assessment. Useful for exporting grades for trackers, E:vision etc.
- On either Gradebook view, click the cog icon on the right of the Gradebook navigation bar to open the Gradebook Settings panel.
- Click Download marks in the Upload and download markbook section.
- Select the appropriate settings:
- Mark records: select Full Gradebook (for the final marks)
- Record details:
- Tick Select All Items or select specific assessment(s) from the list.
- Include feedback: toggle on to also download feedback (for one specific assessment only).
- File Type: .xls or .csv
- Save Location: select My Device (do not use Content Collection)
- Click Download.
Download Results: Test question responses and scores
Use to download: each student's individual answers and scores for each Test question. Might be useful for in-depth question analysis, offline marking etc. There’s also the built in Question Analysis tool.
Tip
Questions are included in the specific order they were presented to each student, so if questions were randomised, ‘Question 1’ will differ for each student. To convert back to consistent question order, select By question and student format and sort by question text.
- Open the Download Results panel:
- Grid View: Click a Test's title in its column header to open the Assessment details panel. Click the download icon (a document with a downward pointing arrow over it) and select Download Results from the drop-down.
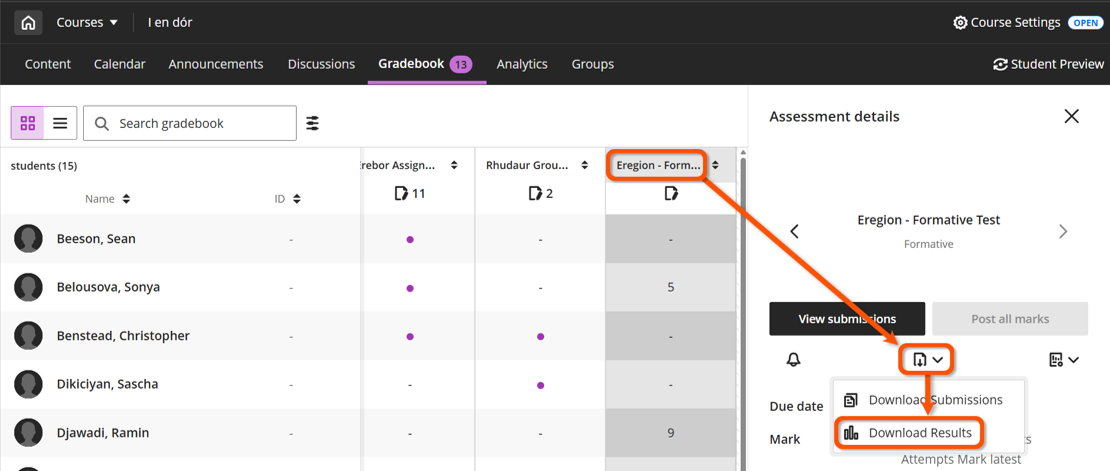
- List View: Click the three dot menu at the far right of the assessment’s row and select Download Results from the drop-down.
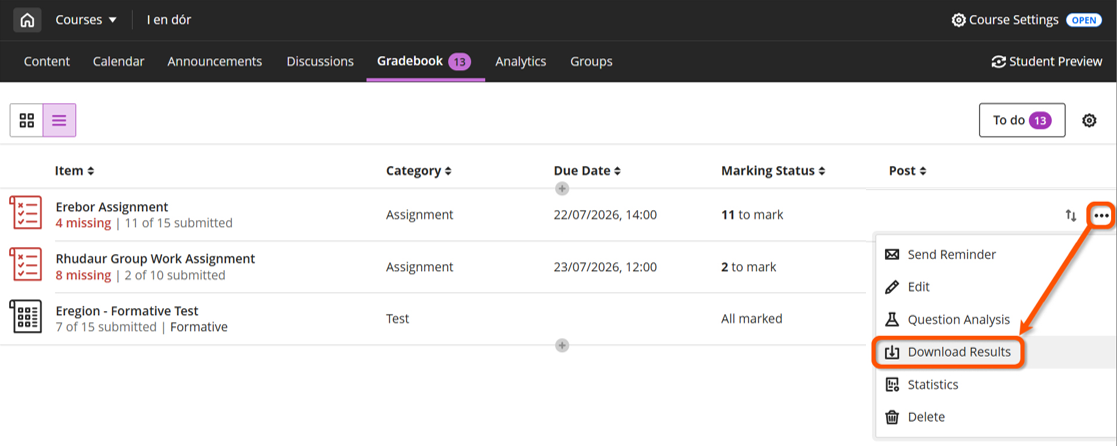
- Grid View: Click a Test's title in its column header to open the Assessment details panel. Click the download icon (a document with a downward pointing arrow over it) and select Download Results from the drop-down.
- Select the appropriate settings:
- File type: .xls or .csv
- Format of results: appropriate option depends on particular use case
- By student: wide format (one row per student). Only really useful if questions appeared in the same order for each student.
- By question and student: long format (one row per question per student). Can easily sort by question text if questions were randomised.
- Attempts to download: select ‘Mark attempts’
- Click Download.
Download submissions: Ultra Assignment
Tip
For an Ultra Test, this downloads the submission information (time, overall mark), but not the student's answers. Use Download Results above for this.
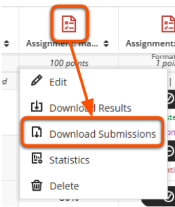
Use to download: all submissions made to a specific Ultra Assignment as a ZIP file.
- On the Grid View, click a Test's title in its column header to open the Assessment details panel.
- Click the download icon (a document with a downward pointing arrow over it) and select Download Submissions from the drop-down.
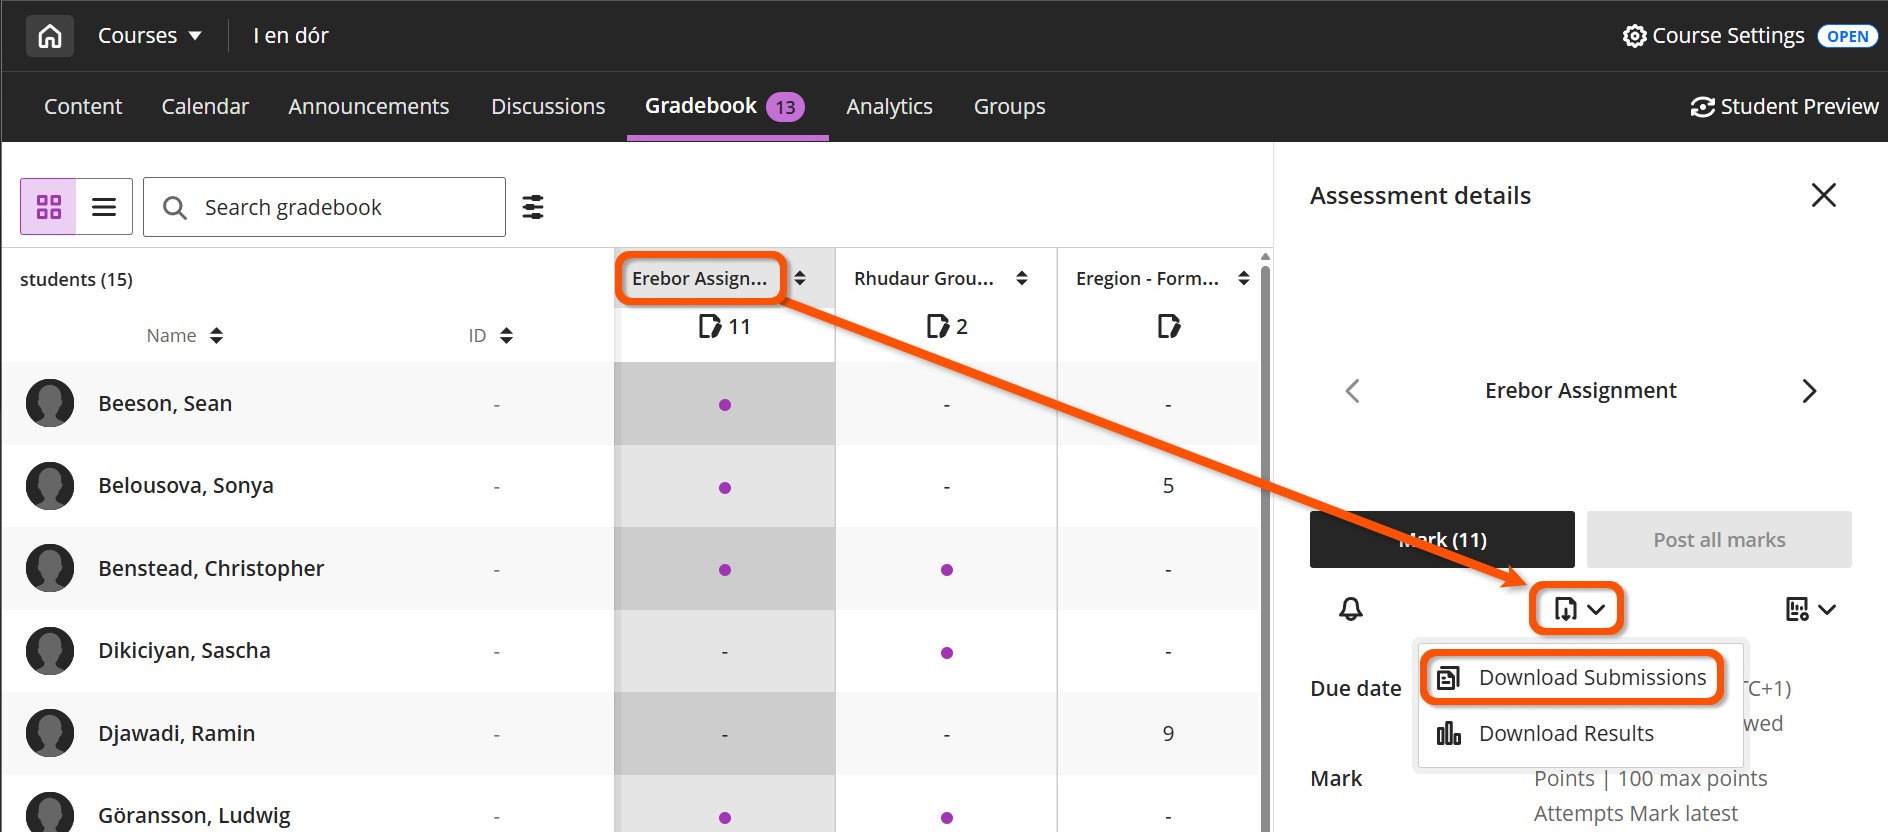
- Select individual student(s) or tick the box next to Name at the top to select all students.
- Click Create ZIP File, then click the Send button on the confirmation panel that appears. When the ZIP has been prepared the system will send an email to your University email address with a link to download the ZIP.
Mark statistics
Use to: review and analyse overall mark distributions. For Tests, question-level analytics are also available.
- Open the assessment Statistics panel:
- Grid View: Click an assessment's title in its column header to open the Assessment details panel. Click the statistics icon (document with a bar graph on it) and select Statistics from the drop-down.
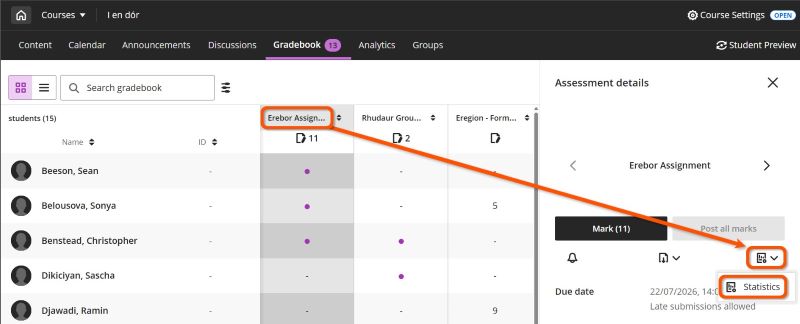
- List View: Click the three dot menu at the far right of the assessment’s row and select Statistics from the drop-down.
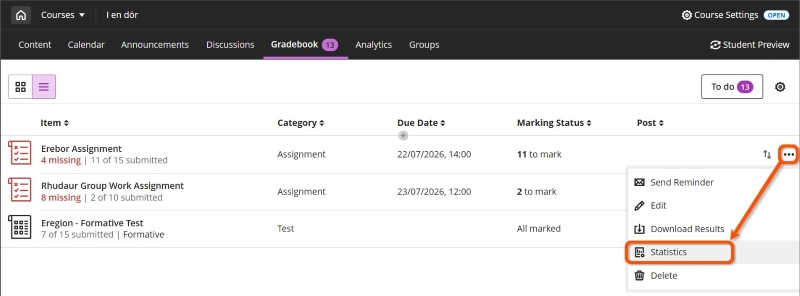
- Grid View: Click an assessment's title in its column header to open the Assessment details panel. Click the statistics icon (document with a bar graph on it) and select Statistics from the drop-down.
- Review the statistics. Note that these include any automatic zeroes assigned for non-submission.
- Grade Statistics: count (of different grades awarded), min, max, range, average, median, sd, variance
- Marking Status: count of submissions completed, still to mark etc.
- Grade Distribution: the count of marks in each 10% band, or each mark schema band (if used).
- If desired, copy/paste the statistics for use elsewhere or use the dropdown menu to select another assessment.
Monitor student review of feedback
Use the feedback review label to monitor whether students have reviewed their mark and feedback for a particular assessment.
This only relates to Ultra assessments: Assignment, Test etc.
- Click a student's name on the Grid View to open the student overview page.
- Locate the relevant Assessment in the list.
- For Ultra Tests and Assignments where marks have been posted (ie. made available to students), the Status column indicates if a student had reviewed their feedback or not.